Sunday, October 23, 2011

Assignment on the video, Factory!

Focus Questions:

Identify the imagery by listing what you see e.g. objects, shapes.

The imagery portrayed in the video, Factory, shows body parts (hands) picking up and lifting objects, men walking into the factory and doing repetitive movement with a variety of items, women using computers and different objects working to make the product in the factory. The shapes that are shown are an assortment of tools that have been enlarged to signify that the factory is bigger than the people working inside it.

What is your overall impression of the mood of the work?

Overall the mood of the work gives the impression that the factory is very depressing, as it looks tiring and hard for the workers. It also is very dull and drab because the whole animation is in black and white.

Watch and Listen for visual language cues, sound cues and editing

During the animation, the audience hears many different sounds to add meaning, mood and involve the audience. The sounds include; machine noises, screws, smoke coming out of the factory, blimps, computer and keyboard sounds and people making noises. All of these sounds help make the animation create the effect that it’s a hard and depressing job to work in a factory. During the video, there are a variety of elements that have been used containing:

· Emphasis

· Proportion

· Repetition

· Rhythm

· Scale

· Sequence

· Tension

In the animation, emphasis has been used to create the hand that picks up objects and put them into a different box. The hand has been enlarged to make it more obvious and to create the effect that it is a machine. Proportion is shown throughout, as the tools and machines have been made a lot bigger than the actual people. Repetition is also shown throughout in the jobs that they have to do. Rhythm is displayed in the sound and in the relationship of the machines to the people. Scale has been used in the animation to show perspective and to indicate that different objects are bigger or smaller than others, eg. The machines look bigger than the people. There is a certain sequence in the video illustrating that it’s hard to work in a factory and that it is very time consuming and repetitive. Tension is also shown during, to help make the audience become more involved with the video.

Analysis:

Notice the visual language used by Matreyek. List what you identify.

During the video, Factory, the visual language that I identified was:

· Line

· Movement

· Shape

· Scale

· Emphasis

· Proportion

· Repetition

· Rhythm

· Sequence

· Tension

Notice the sounds. List these identifying their type and quality.

The sounds include; machine noises, screws, smoke coming out of the factory, blimps, computer and keyboard sounds. The machines in the factory are repetitive and have a rhythm to them. The sound is in a pattern, as it repeats throughout the video. Throughout, the audience hears screws being twisted and put in place. They make a squeaky and noisy sound. At the beginning of the video, the audience can hear the smoke coming out of the factory and blimps in the sky. They are a rough, noisy sound that lasts for the whole beginning of the animation. When the scene comes on showing the lady working two computers at a time, the audience can hear keyboard and computer noises. They are loud but each noise is short.

Interpretation:


What is your interpretation of the work?

The work suggests that it is hard and tiring to work in a factory. It illustrates that it is a very repetitious job and there is many long hours spent doing the same thing. Others may find that the work shows that factories are bad for the environment. There are many different interpretations of the work.

Survey friends and family – what do they think the work is about?

A fellow year 9 student has said that the video is about how people are bored of work and they have become robots in a factory. Another fellow year 9 student said that it was about how repetitive life can be. A different fellow year 9 student said that it was about how little people live inside you and make you work. Therefore, there are many different interpretations of the work.

Who do you think is the intended audience for Matreyek’s work?

The intended audience for Matreyek’s work is adults looking for a job. This is the implied audience, as it advertises work in a factory and some adults may be interested in this lifestyle or career.

How does visual language inform your interpretation?

It helps the audience to understand the animation more and analyse the video. It helps show the sounds that objects can make and show pictures of items.

How has Matreyek used sound with the animation images to help create meaning?

Metreyek has used sound with the animation images to help create meaning by showing the objects at the same time making a sound for them and this helps let the audience know what the sound is that an object makes.

Monday, October 17, 2011

Term 4 so far...

For the last two weeks, Mr Powell has shown us three different videos from the same artist that illustrates the use of Animation-ish. All of these videos have been very unique and interesting. I can see that a lot of hard work and time has gone into them. Mr Powell, then set us a task to analyse one of the videos and talk about how you think they have been made. I am choosing to do the task on the video, Factory. This video represents many people working in a factory and how it can be very hard, tiring and repetitious. This video uses many different programs including; Photoshop, iStopMotion and Animation-ish.

Thursday, September 15, 2011

A Highschool Fairytale.

I have now finished my animation-ish and decided to call it A High school Fairytale. All my scenes were completed and successful, except for scene 8, which was deleted because I felt that it wasn't necessary. I nearly ran out of time towards the end of my animation-ish because some of the scenes did not save properly, so I had to redo them and others took longer than expected. To solve this problem, I hired out a laptop from the school to use the program animation-ish and finished my movie at home. Using the program, iMovie, I put all my scenes together, added credits and the title, 'A Highschool Fairytale,' at the beginning. I then edited the movie, so that each scene blurred into the next one. After that was finished, I exported the movie into garageband, as I needed to add music in the background. I chose the song, Beautiful Soul, by Jesse Mcartney because it worked well with my movie and it is one of my favourite songs. I had to edit the song to make sure that the music was in time with my movie. I also added a school bell, when the picture of the school appeared. I did this to illustrate to the audience that it is school time. After I had finished editing my movie on Garage Band, I exported it to my USB and then watched it. I found working with the application, Animation-ish, very pleasant and interesting to learn how to use all of the different tools and equipment that the program has to offer. I have thoroughly enjoyed doing this unit of work in Media and hope to be able to do it again.

A Highschool Fairytale:

Deleted scenes from my animation-ish!

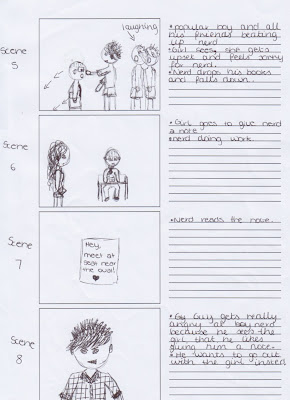
Scene 8 was deleted from my animation-ish, as I felt that it wasn't necessary. Scene 8 showed the popular boy getting mad and jealous when the girl handed the nerd a note in the classroom. I felt that this scene was not needed because the other scenes highlighted scene 8 within them.

Scene 12!

In scene 12 of my animation-ish, the nerd finds the popular girl's note that she wrote to him and forgives her. They both start smiling and when this happens, we see a close-up shot of their faces. I was able to make this shot by adding a key-frame and using the truck tool in the application. The audience can then see that they are falling in love with each other. Love hearts appear in the air to show this. The background image in this scene is a picture of the oval at the high school. The same background picture was used in scene 10!

Scene 12 of my animation-ish:

Background image in scene 12:

Scene 11!

In scene 11 of my animation-ish, it shows the popular girl at home on her bed crying because she hurt the nerds feelings today at school when she walked off with the bully. So, she decides to write the nerd a note. The note says: 'Im Sorry.' It then has a picture of a love heart. At the end of scene 11, it illustrates the popular girl smiling because she feels better now that she has apologised in her note. The background picture for when the poplar girl is crying displays her bedroom. When she starts writing the note to the nerd, the background changes to a picture of her duhna on her bed. Finally, when the popular girl smiles after she has written the note, the background shows the pillows on her bed.

Scene 11 of my animation-ish:

Background picture when the popular girl is crying:


Background picture when the popular girl writes the nerd a note:


Background picture when the popular girl is smiling:

Sunday, September 11, 2011

Scene 9 &10!

In scene 9 and 10 of my animation-ish, the bully (popular boy) and his friends tell the nerd to stay away from the popular girl, as the bully likes her. This shot is shown at a park bench in the high school. The popular girl arrives and becomes very upset when she hears that she is not allowed to talk to the nerd, as he could get very hurt if she does. Then, in scene 10, the popular boy walks off with the popular girl in front of the nerd to make him very upset. The popular girl also becomes very upset because she doesn't want to walk with him, but feels like she has to. The background for this shot shows the oval at the high school.

Scene 9 & 10 of my animation-ish:


Background picture in scene 9:


Background picture in scene 1o:

Sunday, August 21, 2011

Scene 6!

During scene 6 of my animation-ish, the popular girl goes to the classroom, which the nerd is in, and gives him a note. The nerd is happily studying, when the popular girl walks in. The nerds facial expressions show that he is shocked that the popular girl is even near him. Once she has given him the note, she walks away and doesn't say anything. The nerd is still shocked. In the background of scene 6, there is a picture of the classroom with desks and chairs and no body inside, except the nerd studying.

Scene 6 of my animation-ish:


Background picture in scene 6:

Wednesday, August 10, 2011

Scene 5!

In scene 5 of my animation-ish, it opens with a picture of the school, like in scene 1. I will have a bell sound effect in the background, so that it looks like school has just started. Then the background picture changes to the hallway in my high school. It also shows the lockers. We then see the nerd walking down the hallway. The popular boy and his friends enter and start bullying the nerd. The popular girl walks in and sees him getting bullied. She then sees the popular boy that likes her walk away with all his friends. The popular girl gets very upset, but she doesnt do anything about it. She wants to help the nerd, but she is worried about her reputation of being popular being destroyed. In the background, there is a picture of the hallway in my high school. It also shows the lockers.

Scene 5 of my animation-ish:


Background image of the school in my animation-ish;


Background image of the hallway in my animation-ish:

Monday, August 8, 2011

Scene 4!

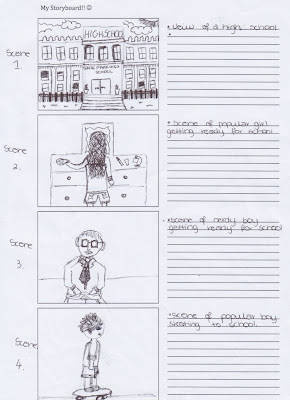
Scene 4 of my animation-ish shows the popular boy skating on his skateboard to school. The picture in the background shows the shops and restaurants that he is skating past.

Scene 4:

Scene 3!


In scene 3 of my animation-ish, we see the nerdy boy getting ready to go to school in the morning. He is reading a book. I was able to create this effect by moving his eyes from side to side and moving his head occasionally. I have a picture of his bedroom in the background.

This is scene 3 of my animation-ish!


This is the picture of his bedroom:

Scene 2!


In scene 2 of my animation-ish, it shows the popular girl getting ready for school in the morning. She is spraying perfume on herself. In the background I have put a picture of her dressing table.

Scene 2 of my animation-ish.


Picture of her dressing table:

Scene 1!


Scene 1 of my animation-ish shows a school in America. This is where most of my animation-ish takes place. The picture of the school is a picture that I have found off the internet. It shows the front view. In my animation-ish, the scene starts with a close-up of the school and then it slowly zooms out and shows the whole of the school. I was able to do this by using the truck and adding a key frame.

This is scene 1 of my animation-ish.


Picture of the school from the internet:

Sunday, June 5, 2011

Work during class-time

During class time for the past 2 weeks, I have been working on my animation-ish. I am nearly finished scene 5. This means I am completely up to date. I have made the scene of the school. This is the beginning of my animation-ish and will open up my story. I have also completed scene 2, 3 and 4, which show the characters in my story getting ready to go to school. Based on the different stereotypes I have chosen in my story, they are each doing different things to show that they are getting ready for school. The popular girl is putting perfume on, then the nerdy boy is reading a book and then the popular boy is skating to school on his skate-board. I am nearly finished scene 5, which shows the popular boy and his friends beating up the nerd. Then the popular girl walks in and sees. We then see a close-up shot of her feeling sorry for the nerd. Therefore, I am up to date with my animation-ish. I have also been making sure my blog is up to date and has got all the tasks I need inside it.

Time-frame

6th June 2011
I am completley up to date with my animation-ish at the moment as I have nearly finished 5 scenes. I have approximately 30 lessons in-class time to work on my Animation-ish. I have 12 scenes to make using the program. This means I need to spend 3 lessons in class making 1 scene. So far I have nearly finished 5 scenes and it has been 2 weeks. This means I am up to date and am working well. I am very happy with the progress I have made so far.

Animation-ish verse iStopMotion

I chose to do animation-ish because I enjoyed learning how to use the program more than I did with iStopMotion. I found animation-ish much more interesting and fun to use. I also found that I worked harder at animation-ish and knew how to use the program better than I did with iStopMotion, as i was absent the day Mr Powell taught us how to use iStopMotion.

Sunday, May 22, 2011

My Storyboard!!

Scene 1, 2, 3 and 4
Scene 5, 6, 7 and 8
Scene 9, 10, 11 and 12

My Storyboard:
My storyboard is animated in an American High school. It is about a popular girl falling in love with a nerd, but the other popular boy doesn't want her to because he is in love the popular girl as well. The girl always watches the nerd being beaten up by her peers and she begins to feel sympathetic towards the nerd. The popular girl asks the nerd to meet her at the chair one lunch time, but when she doesn't arrive on time, the popular boy has a stern talk to the nerd about seeing the popular girl. I was going to make the popular boy beat up the nerd, but I thought that it wouldn't be appropriate. Then, when the girl finally arrives at the chair, the boy takes her away from the nerd. This makes the girl very upset. She leaves a note with the nerd and they fall in love!!


Sunday, May 15, 2011

iStopMotion- phone moving


In today's lesson I learn't how to use iStopMotion. I made a video of my phone moving around a desk. This made the phone look like it was moving by itself. I did this by moving my phone a tiny bit on every slide. I really enjoyed using iStopMotion and found it very interesting to learn how to make videos. I also experimented with backgrounds and foregrounds on my video.

Monday, May 9, 2011

Ballerina- animation-ish


In today's lesson and a couple of lessons before today, I made an animation-ish of a student doing ballet. There were a number of steps I had to complete to make this. Firstly, I drew a picture of a ballerina. I then copy and pasted the ballerina onto a new slide and moved it in any direction I wanted. If I wanted the ballerina in a different pose, I could re-draw the ballerina or move a part of her body, by choosing the mouse tool and double-clicking the part of her body I want. By doing this on many different slides, I could make it look like the ballerina was dancing. I really enjoyed making my ballerina and found it very interesting learning how to use Animation-ish.

Monday, April 18, 2011

Today in our lesson, we learn't how to draw a walking man using the trace tool on Advanced-ish. I learnt a lot about Advanced-ish and how you use all the different tools, colours and backgrounds. As well as learning how to draw a walking man, I learnt how to place a background behind my walking man and put clothes on it. I really enjoyed doing this peice of work and found it very interesting!!

My Walking Man :)


Monday, April 11, 2011

Animation-ish: bouncing ball

Today in our first lesson of Term 2 in creative media, we had a play with Animation-ish. We had to make a bouncing ball going off a file on blackboard. I really enjoyed doing this and made my ball colourful. :)

Monday, March 28, 2011

Reflection for my 2nd Mercedean

This was my starting picture for my Avatar assignment!! It is Jessica Alba!! 


In the final image that I have created, Bella looks very angry and irritated. She shows this through her facial expressions!! Her eyes and mouth are wide open with fury and she has grown fangs. Whenever Mercedeans become angry, they grow fangs. Bella looks very tense and wild in this picture.
There were a number of steps that took place to make this image look like a mercedean that has come from the planet Mercedes. The first step I did was finding a picture of Jessica Alba showing anger. I then inserted a leopard fur mask on top of the picture of Jessica Alba. Once I had turned the opacity down on that layer, I started to rub away everything except for her skin. Then when I turned the opacity up, you could see that her skin was leopard fur. When I selected different overlays, the leopard fur mask would change to suit Jessica Alba’s face. I selected the one I liked the best, which was the soft light overlay.
The next step that I completed was to make the eyes bigger. Firstly, I duplicated the layer that had the right eye on it and selected a box around the eye. When I pressed the inverse button and then delete on the keyboard, everything deleted except for the right eye. Now that I only had the right eye, I got a mask and then rubbed out all around the actual eye. When this was completed, I pressed Apple T on the keyboard and stretched out the eye to make it bigger. This process was repeated for the left eye.
The third step to making my Mercedean was to change the colour of the pupils. For this image the colour had to be red because their eyes change colour to show their emotions and red represents anger and irritation. The first thing I had to do was duplicate the layer that had only the right eye on it. I then made a mask on this layer, so that I could rub away everything except for the pupil. Then, when I selected Hue/Saturation and clicked the colorize button, I could change the colour of the pupil to red. This process was repeated with the left eye.
The fourth step that was completed was to make her lips a different, brighter colour and have fangs. The first thing I did to do this was finding a picture of red/orange lips with fangs (vampire teeth). Once I had found the right image, I placed it on top of Bella’s original mouth. I then made a mask on that layer, turned the opacity down and rubbed away everything except for the lips. I lined up the vampire lips with her original lips and adjusted the size of the new lips by pressing Apple T on the keyboard. Now when I turn the opacity up on that layer, it looked like the new lips were meant to be there and that Bella had grown vampire fangs.
The fifth step to finishing my Mercedean was to liquify parts of the face and ears to make her look more like an alien. Every Mercedean is born with a special feature on them. Bella has three lines below her eyes. To do this, I selected the layer that has her face on it. I then selected the liquify tool and stretched her skin in a line down her face below her eyes, to give the effect I wanted. I did this three times below each eye. When this was completed I stretched out the bottom of her ears to make her ears look different from normal ears. After I had finished using the liquify tool, Bella looked much more like a Mercedean and looked like she had come from a different planet called Mercedes.
The sixth step that had taken place to make my Mercedean was to put in a forest background. I had found a picture off the Internet of a rainforest and decided to use it as my background for my Mercedean. It shows what the planet Mercedes looks like. Firstly, I dragged the background over Bella, and made it the same size as the canvas. I made sure that the background was behind all the other layers. I then, turned down the opacity on the original picture of Bella and made a mask. I then rubbed away everything, apart from her. Now my background was completed.
The last step that was completed to finish my Mercedean was to change the colour of her shirt. Mercedeans don’t wear normal singlets, they use leaves as their clothes, as they live in a rainforest environment and do not know how to sew or knit. The first thing I did was to find a picture of leaves on the Internet. I then saved that image to desktop and opened it in Photoshop. After that, I dragged the image over Bella’s singlet. When I turned the opacity down on that layer and made a mask, I could rub away the parts of the leaves that were not connected to the singlet. Now when I turned up the opacity, the leaves were in the shape of her singlet. After this was completed, I had finished my Mercedean!!!

I really enjoyed doing this piece of work and learnt a lot about Photoshop and how to use it. I enjoyed using all the different tools and making a Mercedean. I found it was interesting and was always excited to do it.
The things that I found I did really well at was that I always made sure that I was updating my blog, so that I didn’t have to do it all last minute. I also made sure that I was using my time appropriately and responsibly, so that I didn’t spend five weeks on one Mercedean and one week on the other. I made sure that I got them both done in time and that I spent reasonable amounts of time on each Mercedean.
The things that I found I didn’t do very well at or that I could have done better at were saving my images after I had completed different steps, so that I could show them as I am explaining how I completed the steps. I also needed to put my final images that I had created by using Photoshop onto blogger when I had Photoshop handy, otherwise they will not load. 

Saturday, March 26, 2011

Reflection for my first Mercedean.

This is the original image that I used for my Mercedean!!


In the final image that I have created, Bella is very happy and blissful. She shows this through her facial expressions!! Her eyes are wide open and she is showing a half smile. Bella looks very natural and calm in this picture.
There were a number of steps that took place to make this image look like a mercedean that has come from the planet Mercedes. The first step I did was finding a picture of Jessica Alba showing happiness. I then inserted a leopard fur mask on top of the picture of Jessica Alba. Once I had turned the opacity down on that layer, I started to rub away everything except for her skin. Then when I turned the opacity up, you could see that her skin was leopard fur. When I selected different overlays, the leopard fur mask would change to suit Jessica Alba’s face. I selected the one I liked the best, which was the soft light overlay.
The next step that I completed was to make the eyes bigger. Firstly, I duplicated the layer that had the right eye on it and selected a box around the eye. When I pressed the inverse button and then delete on the keyboard, everything deleted except for the right eye. Now that I only had the right eye, I got a mask and then rubbed out all around the actual eye. When this was completed, I pressed Apple T on the keyboard and stretched out the eye to make it bigger. This process was repeated for the left eye.
The third step to making my Mercedean was to change the colour of the pupils. For this image the colour had to be blue because their eyes change colour to show their emotions and blue represents happiness and calmness. The first thing I had to do was duplicate the layer that had only the right eye on it. I then made a mask on this layer, so that I could rub away everything except for the pupil. Then, when I selected Hue/Saturation and clicked the colorize button, I could change the colour of the pupil to blue. This process was repeated with the left eye.
The fourth step that was completed was to make her lips a different, brighter colour. The first thing I did to do this was, duplicate the layer with her lips. I then made a mask on that layer and rubbed out everything except for the lips. When this was finished, I selected Hue/Saturation and clicked the colorize button to make her lips a red, orange colour.
The fifth step to finishing my Mercedean was to liquify parts of the face and ears to make her look more like an alien. Every Mercedean is born with a special feature on them. Bella has three lines below her eyes. To do this, I selected the layer that has her face on it. I then selected the liquify tool and stretched her skin in a line down her face below her eyes, to give the effect I wanted. I did this three times below each eye. When this was completed I stretched out the bottom of her ears to make her ears look different from normal ears. After I had finished using the liquify tool, Bella looked much more like a Mercedean and looked like she had come from a different planet called Mercedes.
The last step that had taken place to make my Mercedean was to put in a forest background. I had found a picture off the Internet of a rainforest and decided to use it as my background for my Mercedean. It shows what the planet Mercedes looks like. Firstly, I dragged the background over Bella, and made it the same size as the canvas. I made sure that the background was behind all the other layers. I then, turned down the opacity on the original picture of Bella and made a mask. I then rubbed away everything, apart from her. After this was completed, I had finished my Mercedean!!!

I really enjoyed doing this piece of work and learnt a lot about Photoshop and how to use it. I enjoyed using all the different tools and making a Mercedean. I found it was interesting and was always excited to do it.
The things that I found I did really well at was that I always made sure that I was updating my blog, so that I didn’t have to do it all last minute. I also made sure that I was using my time appropriately and responsibly, so that I didn’t spend five weeks on one Mercedean and one week on the other. I made sure that I got them both done in time and that I spent reasonable amounts of time on each Mercedean.
The things that I found I didn’t do very well at or that I could have done better at were saving my images after I had completed different steps, so that I could show them as I am explaining how I completed the steps. Also posting this blog when I had photoshop to use, so that I was able to show the end result of my Mercedean. 

Sunday, February 27, 2011

Practice Masking 2!!

This was my original image!!


http://taylorswiftbiography.net/wp-content/uploads/2010/03/taylor_swift_profile.jpg

This is my shopped image that I masked using Photoshop!!
To mask this image, I completed a number of different steps. The first thing I did to complete this image was drag the mask onto the picture of Taylor Swift. I then turned the opacity down on that layer. After that I selected the paint brush tool and painted over everything except Taylor Swift's skin. I then changed the overlay, so that the mask made all of Taylor Swift's features look normal, like her neck and nose, etc. I kept adjusting the opacity so that I was happy with my creation. I enjoyed doing the process of masking very much.


Practice masking 1!!


This was my original image!!


http://t3.gstatic.com/images?q=tbn:ANd9GcSf2k-PIR7Rckh2_Ce7TVSch13XiRw6pcgv-myFQl3k0MC_2b7F

.
.

 This is the shopped image with a tiger fur mask on it that I have created using Photoshop.
In class I was practicing how to mask a person with a type of animal fur. I used tiger fur to mask over Chris Brown's skin. I was able to do this be completing a number of steps. The first step I completed was dragging the tiger skin over the picture of Chris Brown. I then turned the opacity down on that layer. After that I selected the paint brush tool and painted over everything except the skin. When I made the paint brush smaller and zoomed in on the picture I could paint over the background in more detail. When I had finished this process, I selected overlay, which made the fur blend into the shape of his face and neck look more define and normal. I enjoyed doing the process of masking!! :)

Thursday, February 24, 2011

Personality Profile for my Avatar's!!

The species that I created are from the planet Mercedes, south-east of Earth. They are very friendly, energetic and adventurous Mercedeans. They care and look after all the different types of animals and plants that grow in the planet Mercedes. The Mercedeans eyes are very big and change colour when their emotions change. Every Mercedean has a different type of animal fur as skin and they have different coloured lips. Their hair is a natural colour as well as their eyebrows. They also have really long, extended ears.

When other creatures that are not apart of their race come to destroy the Mercedeans environment, they grow colored fangs and teach the animals that belong to the planet, Mercedes, to scare the predators away. During the day, the Mercedeans enjoy climbing and swinging from tree to tree, riding the different types of animals, eating different types of fruit from the species of plants and adventuring around the forests with friends. The environment is very green, has lots of rivers and lakes, and a variety of unique trees and plants. Overall my species of Mercedeans are unique, adventurous and caring.

The creature I'm depicting, Bella, is caring, joyful and environmentally friendly. She shows a variety of different emotions, including happiness, fear and anger. Bella, as well as her fellow Mercedeans, shows her emotions through her facial expressions and the colour of her eyes. For example, when she is angry, her eyes turn red, but when she is happy, her eyes turn blue. Bella uses her emotions to show how she is feeling. Every Mercedean is born with a unique feature on them. Bella has three lines below her eyes as her unique feature. Bella is usually very friendly, protective and a happy Mercedean.

Wednesday, February 16, 2011

Photoshop- liquifying

http://www.dogsranch.com/wp-content/uploads/2010/01/pug9.jpg

This is the original image I used.

This is the image I created using the tool, liquify, on photoshop!!

There were a number of steps that took place to create this image. The first step I did was select the liquify tool on photoshop. Once I had selected the liquify tool, I started to expand the eyes so that they were much bigger and bulgier. I then pulled down the ears, so they were long and floppy. I really enjoyed using the liquify tool on photoshop.

Sunday, February 13, 2011

fustrated- emotion 2

http://wwwdelivery.superstock.com/WI/223/1660/PreviewComp/SuperStock_1660R-9099.jpg

This woman is clearly very frustrated. You can see this through this image. The lady has her books all over the place, which means she is very unorganised. She is talking on the phone to someone and at the same time writing down information. You can see that she is a very busy woman. The lady is frustrated because she is busy and unorganised, so her work is not getting done. Her facial expressions also show that she is very frustrated.

fustrated- emotion 1

https://blogger.googleusercontent.com/img/b/R29vZ2xl/AVvXsEh7-rBRDruke9ebEf9MKSMyumlLIiOwcK1DodulJ1HA9fV1I3eUBD1kDXzHBT6VBgzAAVUTsgvwL84DTCr-fDKB6vg07JdqmO7juFjv1AT5UU9CSa2jLTBfdw-u_g1dNhPKpbso5vNZ1aXV/s1600/frustrated.jpg

In this image you can see that this teenage girl is very frustrated. She is squeezing her head tightly while she is reading a book. This girl looks like she is becoming frustrated over her book. She is confused and doesn't understand what she is reading. There are obviously lots of other things on the back of her mind, and it is making her unfocused. From this happening, she is becoming more and more frustrated.

fustrated- emotion

http://www.goyourownwayvacations.com/wp-content/uploads/2009/01/frustrated_woman_computer1.jpg

This image portrays the emotion frustration. You can clearly see that this woman is frustrated by her computer. Her hands are squeezing her head and pushing her hair back. Her eyes are shut tightly together and her facial expressions look puzzled and exhausted. There are two pieces of paper on the desk that have been scrunched up into a ball by the lady because she is confused and doesn't understand her problem. This makes her frustrated. 

happiness- emotion 2

http://therandom.me/wp-content/uploads/happy-elephant-01-1.jpg

This elephant is clearly very happy. Just by looking at the elephant's huge grin on its face, you can tell that this is a very happy, playful elephant. It is playing around underneath the waterfall and splashing water out of its trunk. If this elephant lives in a zoo or an elephant park, this image clearly shows that it has caring and nice owners or guardians. This is one very happy elephant.

happiness- emotion 1

http://aprints.org/AP%20Documents/Happy%20poor%20child.jpg

This little, African child portrays happiness through this image. She shows that she is happy by smiling, having wide, open eyes and by reaching out her hand. Her cheeks are very bright and full of delight. When people are upset or angry they squint or close their eyes a bit, but when people are happy their eyes become wide open. This little girl has her eyes wide open, which also makes her eyebrows lift up and show that she is full of joy. She is reaching out her hand, which shows that she is happy because when people are upset or sad they keep their hands to themselves. Overall, through this image you can see that this little girl is very happy even though she might not have the best lifestyle or home. She obviously has a very kind and caring family that makes her very happy.

Friday, February 11, 2011

Sadness- emotion 2


http://www.google.com.au/imgres?imgurl=http://www.whydoes.org/wp-content/uploads/2009/11/Dog-Cry.jpg&imgrefurl=http://209.157.64.200/focus/f-chat/2527724/posts&usg=__x013hL-bvqk-i6ziRJ7-GhazJbs=&h=338&w=450&sz=45&hl=en&start=0&zoom=1&tbnid=Gm4Z20WfW_Mc2M:&tbnh=130&tbnw=173&ei=fLBUTbbmHYb6cLj2_OYI&prev=/images%3Fq%3Dcrying%2Bdog%26um%3D1%26hl%3Den%26client%3Dsafari%26sa%3DX%26rls%3Den%26biw%3D948%26bih%3D550%26tbs%3Disch:1&um=1&itbs=1&iact=hc&vpx=650&vpy=75&dur=5&hovh=194&hovw=259&tx=176&ty=72&oei=fLBUTbbmHYb6cLj2_OYI&esq=1&page=1&ndsp=15&ved=1t:429,r:4,s:0

This little pug is showing sadness by having tear drops in its eyes. This shows sadness because it is crying. The little pug’s eyes are also bulging like it is begging for forgiveness. Its forehead is also very crunched up and wrinkly. This feature makes the pug look very sad and confused. The little puppy looks like it needs some comfort and care from its family. 

Sadness- emotion 1


This little girl is showing sadness. She is showing sadness by squeezing her eyes really tightly. She is squeezing her eyes really tightly because she is trying to stop crying. This makes the little girl look sad. She is also squeezing her lips together as another way to stop her from crying. These two features help show that she is sad and trying to stop crying. She is showing the emotion called sadness. 

Tuesday, February 8, 2011

photoshop - frog and emu :)

In class we discussed surreal images. Surreal images are images that look like real creatures, that haven't been discovered yet, but they are actually not real. To make this image I had to go through a number of steps. The first thing I did was lined up the emus eyes with the frogs eyes. Once I had finished that, I added a mask to the layer. Now that I had a mask, I could rub out all the emus body except for the beak and hair, so that when I turned up the opacity, I could see a frog with an emus beak and hair. This made the image look like a surreal image. I then duplicated the layer, so that if I made a mistake I could just get rid of the layer and start again. I called one layer beak and the other layer head. Now when I clicked on each layer it would show those parts of the emu/frog. I then colorized each part of the emu/frog to make it look cool and funny. I chose to make the beak blue and the hair bright purple. Mr Powell let us play around with our emu/frog and taught us to do many different things. We did this activity a few times to get used to the steps of making an image look surreal. I really enjoyed working on this piece of work.

Monday, February 7, 2011

Sadness

This image portrays sadness. The young girl shows this by covering her face with her soft, weak hands to hide her tears and by squinting her eyes. Around her eyes have gone red and have started to puff up and become blurry from her tears. This shows that she is sad because she has been crying. Her lips also show sadness because they are held closely together to help her from crying and screaming. This image clearly shows that the young girl is feeling lonely and needs help and comfort from her family. She looks very tense, like she is trying not to cry anymore.