Wednesday, August 15, 2012
Our Film!
In our film, we are using miss-en-scene, cinematography and sound and editing. Mise-en-scene includes, lighting, props, costumes and style of acting. We have incorporated all of these elements into our filming and made sure they all work with the camera. We used costumes and props to help show our characters and what they were doing. We used lighting to help get a good effect on the camera footage and help show distinct features on us. We all used the same style of acting to show that we are all princesses and all want revenge on the prince. Cinematography includes the camera movement and camera angles. Using a tripod and video camera we were able to achieve different effects. Throughout our film, we have used different camera angles to show different shots and a lot of camera movement, as the characters keep moving during the whole movie. We have used editing, as we needed to edit our all of our scenes together to help make them flow and tell a story. After editing our film together, we put lots of sounds and music in the background to help give emotion and feeling to the story. Therefore, we have used miss-en-scene, cinematography, sound and editing throughout our film and this has helped give it a storyline and show many details of the movie.

Sunday, August 12, 2012
So far this term..
My group has worked very well together and we have progressed as a team. As two members of our group, including me, have been sick for a week, we get an extension on our work for an extra week. That allows us time to film tomorrow afternoon and do the wedding scene of our film. We are also going to film this Sunday afternoon and get the rest of our movie finished. We have each contributed to parts of the film and making the props list, shots list, etc. We have all contributed our own ideas to costumes and lighting and have worked out the outcomes as a group. I think our group has worked very well together and helped each other make the film. We have already filmed the beginning of our movie and have film just in case there are parts that we don't get completed. I have enjoyed filming so far and working as a group.
Time Code!

The first bar measures the amount of hours, the second bar measures the amount of minutes, the third bar measures the amount of seconds and the fourth bar measures the amount of frame. Directors use time code to be able to film, record and produce major screenings
Wednesday, August 1, 2012
3 point lighting set up!
There are three lights used to achieve this setup:
- Key Light
- Fill Light
- Rim Light (also called the back light)
All of these lights are adjusted to achieve the classic Hollywood lighting scheme called three-point lighting.
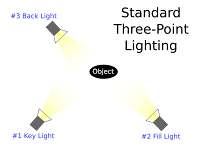
The Key Light creates the subject's main illumination and defines the most visible lighting and shadows. Your key light represents the dominant light source, although, the key light does not have to be positioned exactly at this source.
The purpose of the Fill Light is to soften and extend the illumination provided by the Key Light, and makes more of the subject visible. Fill Light can simulate light from many secondary light sources and reflect them to bounce light into your scene.
The Rim Light (also called Back Light) creates a bright line around the edge of the object to help visually separate the object from the background.
- Key Light
- Fill Light
- Rim Light (also called the back light)
All of these lights are adjusted to achieve the classic Hollywood lighting scheme called three-point lighting.
The Key Light creates the subject's main illumination and defines the most visible lighting and shadows. Your key light represents the dominant light source, although, the key light does not have to be positioned exactly at this source.
The purpose of the Fill Light is to soften and extend the illumination provided by the Key Light, and makes more of the subject visible. Fill Light can simulate light from many secondary light sources and reflect them to bounce light into your scene.
The Rim Light (also called Back Light) creates a bright line around the edge of the object to help visually separate the object from the background.
Sunday, July 22, 2012
Converting Kodak Zi8 Files For Use in iMovie and Final Cut
1. Select this icon from your applications folder or the Dock:

2. To open a video file, simply drag it into the centre of this window


3. On the top menu select: File
Then select: Export to Quicktime

4. Ensure you match these settings:
- Apple Intermediate Codec
- Frame Size: 1280x720
- Select Make Movie
- Rename the File
- Save the new file on your USB or Hard Drive

5. Open Final Cut from the Dock by selecting this icon

The Final Cut Interface:

6. Check your project settings. Click on the Browser window and this is where your clips and sequences will later be stored.

7. Go to the file menu and select easy setup

8. Set your project Format to Apple Intermediate Codec with a Rate of 29.97 fps. Use the exact options indicated below:

2. To open a video file, simply drag it into the centre of this window
3. On the top menu select: File
Then select: Export to Quicktime
4. Ensure you match these settings:
- Apple Intermediate Codec
- Frame Size: 1280x720
- Select Make Movie
- Rename the File
- Save the new file on your USB or Hard Drive
5. Open Final Cut from the Dock by selecting this icon
The Final Cut Interface:
6. Check your project settings. Click on the Browser window and this is where your clips and sequences will later be stored.
7. Go to the file menu and select easy setup
8. Set your project Format to Apple Intermediate Codec with a Rate of 29.97 fps. Use the exact options indicated below:
Sunday, June 3, 2012
Classwork!
Today in class, I have been revising for our up-coming test on friday. I have been going through notes on miss-on-scene, cinematography and sound and editing. Our test mainly focuses on the work we were doing in term 1 and some of the work we have been doing this term. My main resources are from blackboard, nots on my blog and many power points. I will be very excited when this test is over, as then I can concentrate on my assessment, which is producing a film. This is due at the end of next term. I am working in a group of 4 people to help produce this film. I have already created the storyboard, organised the characters and done my film synopsis. I am very excited for next terms work, producing the film.
Friday, June 1, 2012
Storyboard Recipe!
Ingredients:
4x beautiful princesses
1x unfaithful prince charming
1x dark, gloomy forest
1x beautiful church
1x relaxing park
1x oak tree
1x flash back
Black Screen
Various objects
Blood
Tense Music
Credits
Bloopers
Recipe:
Take 4 beautiful princesses and place them in the forest running. Place the unfaithful prince charming in front of them, so that the princesses are chasing after the prince. Place the various objects in the princesses hands and make them start throwing the various objects at the prince, whilst he is running for his life. Add the flashback in and make the princesses appear at the beautiful church and marry the same prince to show that he is unfaithful. Throw in the next part of the flash back when the princesses are all at the park and suddenly see the prince emerging. When they all go to greet him, they discover the truth and are angry about his disloyalty. Then, show the four princesses chasing after the prince again in the forest. Add in a point-of-view shot of one of the princesses throwing heels at the prince, whilst running hurriedly after him. Take the camera back to show the princesses wanting to take revenge on the prince and show a full body shot of him rapidly turning around to face the princesses accepting that they are about to kill him. Supplement a black screen in, so that the audience can only hear the sound of fighting. Show the image again and make one of the princesses kill everyone, instead of just the prince. Move the camera to show an over-the-shoulder shot of the surviving princess writing in blood on the oak tree the words, "Happily Ever After." Have tense music playing in the background and illustrate her walking off smiling and chuckling to herself. Show the credits appear on screen and add the bloopers in afterwards.
4x beautiful princesses
1x unfaithful prince charming
1x dark, gloomy forest
1x beautiful church
1x relaxing park
1x oak tree
1x flash back
Black Screen
Various objects
Blood
Tense Music
Credits
Bloopers
Recipe:
Take 4 beautiful princesses and place them in the forest running. Place the unfaithful prince charming in front of them, so that the princesses are chasing after the prince. Place the various objects in the princesses hands and make them start throwing the various objects at the prince, whilst he is running for his life. Add the flashback in and make the princesses appear at the beautiful church and marry the same prince to show that he is unfaithful. Throw in the next part of the flash back when the princesses are all at the park and suddenly see the prince emerging. When they all go to greet him, they discover the truth and are angry about his disloyalty. Then, show the four princesses chasing after the prince again in the forest. Add in a point-of-view shot of one of the princesses throwing heels at the prince, whilst running hurriedly after him. Take the camera back to show the princesses wanting to take revenge on the prince and show a full body shot of him rapidly turning around to face the princesses accepting that they are about to kill him. Supplement a black screen in, so that the audience can only hear the sound of fighting. Show the image again and make one of the princesses kill everyone, instead of just the prince. Move the camera to show an over-the-shoulder shot of the surviving princess writing in blood on the oak tree the words, "Happily Ever After." Have tense music playing in the background and illustrate her walking off smiling and chuckling to herself. Show the credits appear on screen and add the bloopers in afterwards.
Subscribe to:
Posts (Atom)